


Garden edging may seem like a small detail, but it can have a surprisingly big impact on the overall look and feel of a garden. Acting as a visual boundary between lawns, flower beds, pathways and patios, edging helps create definition, structure and a sense of order. It can make planting schemes stand out more clearly, prevent grass from creeping into borders and give even the most informal garden a more polished appearance.
The good news is that garden edging comes in a huge variety of styles, materials and price points. From traditional brick and natural stone borders to contemporary metal edging, timber sleepers and naturalistic planting, there is an option to suit every type of garden. Whether you are designing a formal landscape, a cottage-style retreat or a modern outdoor space, the right edging can tie the entire design together.
In this guide, we’ll explore a range of garden edging ideas to inspire your next project. We’ll look at the benefits of different materials, where they work best, and how to choose an edging style that complements both your garden areas and the exterior style of your home. Whether you’re planning a complete garden makeover or simply refreshing existing borders or lawn edges, these ideas will help you create attractive, well-defined outdoor spaces.
Why Garden Edging Matters More Than You Think
Walk past any professionally landscaped property and the first thing your eye notices is not the flowers or shrubs. It is the clean, defined lines separating lawn edging from beds. Those crisp edges signal intentional design and careful maintenance, even when the rest of the garden space is relatively simple.
Without edging, your garden beds become battlegrounds. Grass roots tunnel underneath. Mulch migrates during rain. String trimmers scalp plants trying to create a clean line. You spend weekends on your knees with a spade trying to redefine borders that disappear within weeks.
Edging solves four problems at once:
- It creates a physical barrier grass cannot cross
- It holds mulch and soil exactly where you want them
- Provides a lawn mowing guide that protects plants from trimmer damage
- Adds architectural structure that elevates your entire landscape design
The return on investment is immediate. One afternoon installing the right edging eliminates hours of monthly maintenance while making your property look significantly more polished and intentional.
Matching Garden Edging to Your Garden Style


The most attractive garden edging feels like a natural extension of the surrounding landscape. Choosing materials that suit your garden style creates a more cohesive and professionally designed appearance.
Cottage Gardens
Cottage gardens thrive on charm, informality, and abundant planting. Reclaimed bricks, weathered timber, natural stone, and living edges made from ground-cover plants all work beautifully in this setting.
Contemporary Gardens
Modern gardens often feature strong lines and minimalist planting schemes. Steel, aluminium, concrete, and large-format pavers provide the clean, architectural appearance that contemporary landscapes demand.
Formal Gardens
Formal gardens benefit from symmetry and structure. Brick soldier courses, neatly clipped box hedging, and precisely installed stone edging reinforce the sense of order and balance.
Mediterranean Gardens
Terracotta edging, limestone, gravel borders, and warm-toned stone help create the relaxed atmosphere associated with Mediterranean-style outdoor spaces.
Woodland and Naturalistic Gardens
Logs, timber rounds, fieldstone, and living plant edges blend naturally into woodland-inspired landscapes, allowing the planting to remain the main focus.
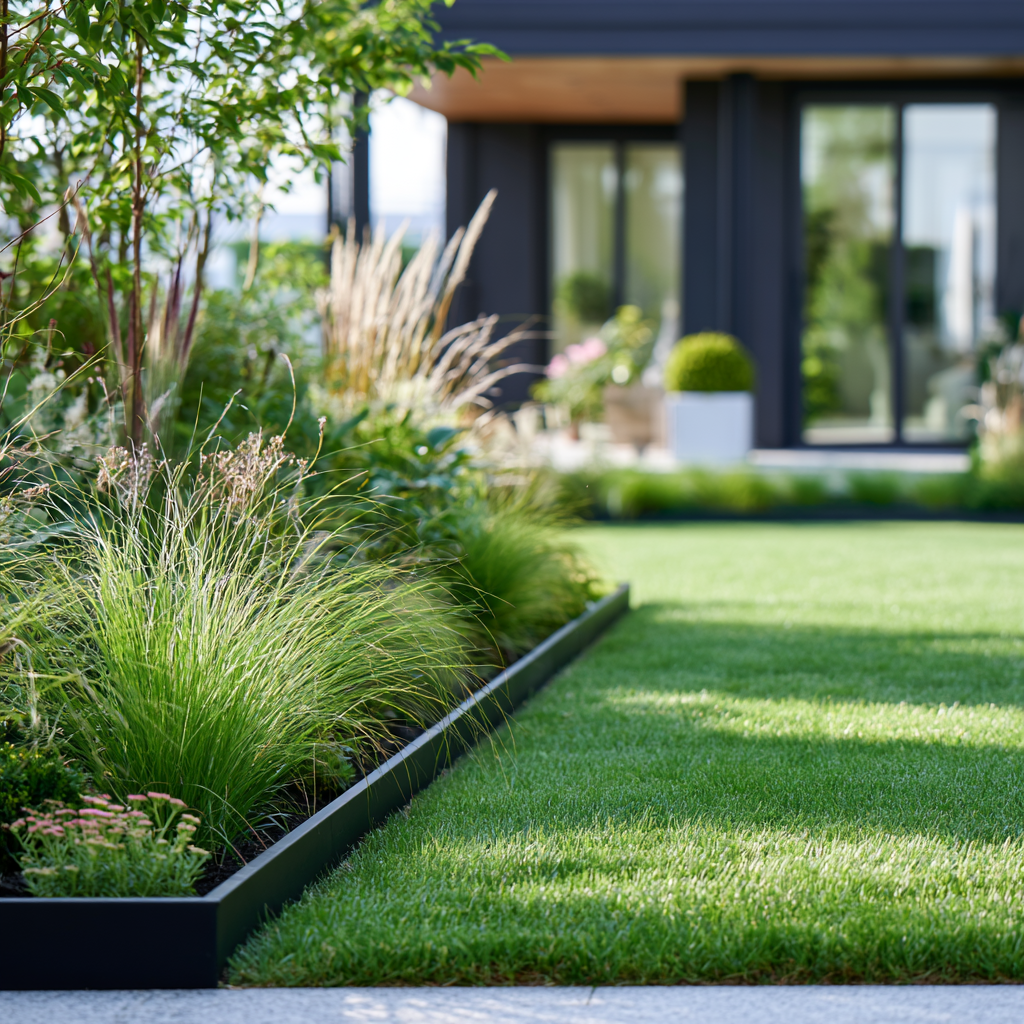
Steel Edging for Modern Clean Lines

Steel edging delivers the sharpest, most contemporary look available. The thin profile nearly disappears visually while creating a knife-edge separation between lawn and garden beds.
Professional landscapers favor steel because it bends to any curve, installs permanently, and requires zero maintenance. The material develops a natural rust patina over time that blends beautifully with soil and mulch, or you can choose powder-coated versions in black or green that stay consistent for decades.
Installation requires a flat spade to cut a narrow trench along your bed line, then you simply press the steel edge into the trench and backfill. The top edge sits flush with or slightly above the soil line, creating a guide for your mower wheels while completely blocking grass rhizomes from crossing.
Three critical installation tips:
- Overlap sections properly. Most steel edging comes in 8 or 16-foot sections with connectors. Overlap joints by at least 6 inches and use the provided stakes to lock sections together, or grass will find the gaps.
- Match the curve radius. Tight curves require shorter sections or specialized flexible edging. Forcing long rigid sections into sharp turns creates gaps at ground level.
- Stake every 3 feet minimum. Ground heave from freeze-thaw cycles will push unstaked edging out of alignment within a single season.
Steel edging costs more upfront than most alternatives but lasts 20-plus years with zero replacement or repair, making it the most economical choice long-term. The clean modern aesthetic works especially well with contemporary architecture and minimalist garden designs.
Aluminium Garden Edging: Another Modern Alternative

While steel edging often receives the most attention, aluminium edging has become increasingly popular in contemporary landscape design.
Aluminium offers many of the same clean visual lines as steel but with several additional advantages. It is lightweight, resistant to rust, and easier to handle during installation. The material can be curved to create flowing bed shapes while still maintaining crisp, professional-looking borders.
Many aluminium edging systems are available in powder-coated finishes, including silver, black, bronze, and dark grey, making them easy to coordinate with modern architectural styles.
Although aluminium typically costs more than plastic edging, it requires very little maintenance and can last for decades when properly installed. If you are seeking a sleek, contemporary appearance without the possibility of rust, aluminium is well worth considering.
Brick and Stone Edging for Traditional Charm

Brick and stone bring old-world character and substance that plastic and metal cannot match. These materials add texture, color variation, and a sense of permanence that complements cottage gardens, traditional landscapes, and historic properties beautifully.
Your main options for stone edges for gardens break down like this:
- Mortared brick: Creates a formal, permanent border that will outlast your house. Requires a concrete footer, proper mortar mixing, and some masonry skill. Best for straight runs and gentle curves. The labor investment is significant but the result is heirloom-quality.
- Dry-stacked stone: Fieldstone or cut stone laid without mortar creates a rustic, organic look. Works for raised beds where you stack 2-3 courses high. Garden stones for edging will settle and shift slightly over time, which adds to the informal charm but means occasional adjustment.
- Brick soldier course: Bricks set vertically in a narrow trench create a tidy sawtooth edge. No mortar required. The bricks should be buried halfway, leaving 4 inches exposed. Pack soil tight on both sides to prevent tilting.
The weight of stone and brick is both advantage and limitation. Once installed these borders stay exactly where you put them. But moving or adjusting them later requires significant effort, so get your bed lines right before installation.
Choose materials that echo your home’s exterior or hardscaping. Red brick matches traditional homes with brick facades. Bluestone complements slate roofs and contemporary stone veneer. Limestone works beautifully with stucco and Mediterranean styles.
Plastic and Composite Edging for Quick Installation

If you need edging installed this weekend without special tools or skills, plastic and composite materials deliver. These products have evolved far beyond the flimsy green strips that popped out of the ground every spring.
Modern composite edging mimics wood grain, comes in realistic earth tones, and includes heavy-duty anchor stakes that actually hold. The flexibility lets you create smooth curves impossible with rigid materials, and the cost is low enough to edge your entire property for a few hundred dollars.
Installation takes three steps: Mark your line with landscape paint or a garden hose. Cut a narrow trench with a flat spade or edging tool. Press the edging into the trench and drive stakes every 2-3 feet, then backfill and tamp.
The main weakness is durability in extreme climates. Freeze-thaw cycles can heave plastic edging out of alignment. UV exposure makes some products brittle after 5-7 years. And plastic simply lacks the visual weight and permanence of metal or stone.
Buy the thickest, heaviest product you can find. Thin flexible edging saves a few dollars but buckles under soil pressure and looks cheap. Professional-grade composite edging costs 3-4 times more than basic plastic but lasts twice as long and actually stays where you install it.
Use plastic edging for temporary beds, rental properties, or areas where you might redesign in a few years. For permanent installations where you want a quality look, invest in steel, stone, or wood instead.
Wood and Timber Garden Edging for Natural Warmth

Garden wood edging brings warmth and texture that works beautifully in cottage gardens, woodland settings, and informal landscapes. The organic look softens hardscape and blends seamlessly with plants and mulch.
Pressure-treated landscape timbers create substantial raised borders. Stack timber for garden edging 2-3 courses high for dramatic elevation changes or use a single timber for a low profile edge. Anchor each course with 12-inch landscape spikes driven through pre-drilled holes into the timber below.
Garden sleeper edging is another popular choice for creating robust and attractive edged borders. Available in timber, reclaimed, or composite styles, sleepers can be laid flat to define pathways and flower beds or stacked to form raised planting areas. Their substantial size creates a strong visual presence in the landscape and makes them particularly effective in larger gardens where smaller edging materials may look lost. They also work well for retaining soil on gently sloping sites while adding a natural, rustic character to the garden.
Cedar and redwood boards offer rot resistance without chemical treatment. Horizontal boards held by stakes create clean lines for vegetable gardens and cutting beds. Vertical boards driven into the ground produce a rustic palisade effect perfect for informal cottage gardens.
The hard truth about wood for garden edging is lifespan. Even rot-resistant species break down in constant soil contact. Expect 7-12 years from cedar and redwood, 15-20 from pressure-treated pine, then budget for replacement. Wood edging is not a permanent solution, but the aesthetic appeal and ease of working with familiar materials makes it worthwhile for many gardeners.
Concrete and Paver Edging for Ultimate Permanence

Concrete edging is forever. Once installed it will outlast your garden, your house, and probably your grandchildren. This permanence is either the biggest advantage or the biggest liability depending on how certain you are about your landscape layout.
- Poured concrete curbing: Professional installers use specialized equipment to extrude continuous concrete borders in any shape. The seamless look is extremely clean and modern. Color can be added during mixing and the surface can be stamped or textured. Costs run 12-18 dollars per linear foot installed.
- Concrete pavers: Precast edging pavers install like brick but offer more size and style options. Lay them end-to-end in a trench with a sand base for a semi-permanent installation, or set them in concrete for a truly permanent border.
- Poured-in-place edging: DIY concrete borders require building temporary forms, mixing concrete, pouring, and finishing. The labor investment is high and mistakes are difficult to correct, but material costs are low and the customization is unlimited.
The visual weight of concrete makes a strong design statement. Use it intentionally where you want to emphasize structure and geometry. The material works best in contemporary, Mediterranean, and desert landscapes where the substantial presence complements the architectural style.
Concrete is unforgiving of layout mistakes. Spend extra time perfecting your curves and lines before installation because changes later require a jackhammer and complete reinstallation.
Living Edges with Ground Cover Plants

The softest, most organic edge is not a product you install but a plant you grow. Low ground covers create a living border that blurs the transition between lawn and garden while suppressing weeds and adding another layer of texture and color.
Top performing plants for garden edges include:
- Creeping thyme: Stays under 3 inches tall, tolerates foot traffic, blooms in early summer, and smells amazing when brushed. Excellent between pavers and along path edges.
- Blue star creeper: Tiny leaves and small blue flowers create a dense mat that handles moderate foot traffic. Stays green year-round in mild climates.
- Mondo grass: Clumping habit creates a neat edge without spreading. Dark green blades stay attractive year-round. Plant on 6-inch centers for a continuous border.
- Sedum: Succulent foliage in green, purple, or variegated forms adds color while requiring almost zero water once established. Low-growing varieties like Sedum album or Sedum rupestre work best.
Living edges require maintenance different from hard borders. You will trim, divide, and manage growth rather than just mowing up to a physical barrier. But the softness and movement of plants create a look that hard materials cannot match.
Plant ground cover edges 6-12 inches wide to create enough visual mass for impact. A single thin line of plants looks skimpy and gets lost against both lawn and garden bed. A generous band reads as an intentional design element.
Wildlife-Friendly Garden Edging
Modern gardens are increasingly designed to support local wildlife, and edging choices can play a role in creating a more nature-friendly landscape.
Living edges planted with creeping thyme, sedum, or other flowering ground covers can provide valuable nectar sources for pollinators. Natural stone edging often creates small gaps and crevices that benefit insects and other beneficial garden creatures.
Where possible, avoid creating barriers that restrict the movement of wildlife such as hedgehogs. Leaving occasional gaps or choosing lower-profile edging can help animals move safely throughout the garden.
Permeable edging solutions that allow water to infiltrate naturally into the soil also contribute to healthier garden ecosystems while helping to reduce surface water runoff.
Trench Edging for Zero-Cost Clean Lines

The simplest natural edge costs nothing, requires no additional materials, and takes about 15 minutes per 20 feet of border. A clean trench cut with a flat spade, edging shovel or half-moon edger creates a crisp line that defines beds beautifully.
Cut vertically along your desired edge line to full spade depth. Then angle the spade to remove a 2-3 inch wedge of soil from the lawn side, creating a small ditch. The vertical wall on the garden side and the angled slope on the lawn side gives you a sharp defined edge and a guide for your mower wheels.
This traditional method works beautifully in formal English gardens where maintenance is part of the gardening ritual. The edge needs redefining every 4-6 weeks during the growing season as grass grows back into the trench.
Three reasons trenched edges still make sense: Zero material cost. Completely natural appearance. Total flexibility to adjust bed lines anytime without wasting materials or wrestling with installed products.
The time investment is the tradeoff. If you enjoy the meditative work of hand-edging and the crisp results, this method is perfect. If garden maintenance feels like a chore you want to minimize, install a permanent edging material instead.
Combining Multiple Edge Types for Maximum Impact
The most sophisticated landscapes layer edging materials to create depth and solve multiple problems simultaneously. A primary structural edge provides the muscle while a secondary decorative edge adds visual interest.
- Steel plus stone: Install steel edging for the functional grass barrier, then place decorative river rock or small boulders along the garden side for texture and color. The steel does the work invisibly while the stone gets the visual attention.
- Trench plus mulch: Cut a maintenance trench, then add a 6-inch band of contrasting mulch like dark hardwood against lighter pine straw. The trench stops grass while the mulch band creates a bold visual stripe.
- Timber plus ground cover: Use landscape edging timbers to create raised bed structure, then plant a low ground cover like creeping thyme along the top and outer face of the timber. The wood provides clean geometry while the plants soften the hard edges.
Think about edging in layers rather than single solutions. The functional barrier that stops grass does not have to be the same element that provides visual appeal. Combining materials lets you optimize for both performance and aesthetics.
Garden Edging Cost Comparison

Here’s a useful at-a-glance cost comparison of the most popular types of garden edging materials. Use it to help you work out the best option for you in terms of outlay cost, lifespan and maintenance needs.
| EDGING MATERIAL | COST | LIFESPAN | MAINTENANCE |
|---|---|---|---|
| Trench edging | £ | Ongoing upkeep | High |
| Plastic edging | ££ | 5–10 years | Medium |
| Timber edging | ££ | 7–20 years | Medium |
| Aluminium edging | £££ | 20+ years | Low |
| Steel edging | £££ | 20+ years | Low |
| Brick edging | £££ | 50+ years | Low |
| Stone edging | £££ | 50+ years | Low |
| Concrete edging | £££ | Lifetime | Very low |
| Living edging | ££ | Long-term with care | Medium to High |
Garden Edging for Sloping Gardens

Sloping gardens present unique challenges when it comes to garden edges. Gravity encourages soil, mulch, and decorative gravel to migrate downhill over time, while heavy rainfall can accelerate erosion and wash materials out of planting beds. Choosing the right edging can help stabilise the landscape while creating attractive, well-defined borders.
For gentle slopes, substantial materials such as garden sleepers, natural stone, and larger pavers often provide enough weight to hold soil in place. Sleepers are particularly effective because they can be installed horizontally to create low retaining edges that follow the contours of the land. This helps establish level planting areas while adding structure and visual interest.
Steeper slopes may benefit from terraced edging solutions. By dividing the garden into a series of smaller levels using sleepers, stone retaining walls, or concrete blocks, you can reduce erosion, improve drainage, and create easier-to-maintain planting zones. Terracing also makes sloping gardens feel more organised and accessible.
Natural stone is another excellent option for slopes because it blends seamlessly into the landscape while providing substantial support. Dry-stacked stone walls can help retain soil and create attractive transitions between different levels of the garden. For a more contemporary appearance, steel edging can be used to define stepped planting beds and pathways, particularly when combined with gravel or ornamental grasses.
When installing edging on any slope, it is important to consider drainage. Water should be able to move naturally through the landscape without becoming trapped behind edging materials. Proper drainage helps prevent waterlogging, soil erosion, and frost damage during colder months.
With the right approach, garden edging can transform a challenging sloping site into a series of attractive, functional spaces that feel intentional and professionally designed.
Maintaining Your Garden Edging

Even the most durable edging benefits from occasional maintenance to keep it looking its best.
At least once each year, inspect edging for signs of movement, damage, or deterioration. Replace broken sections promptly to prevent larger problems from developing.
Timber edging may require periodic staining or treatment to extend its lifespan, while brick and stone borders should be checked for loose sections or deteriorating mortar joints.
Steel and aluminium edging generally require very little maintenance beyond removing accumulated soil and debris. Plastic edging may occasionally need to be reset if frost or ground movement causes shifting.
Living plant edges should be trimmed and divided as necessary to maintain their shape and prevent them from spreading into unwanted areas.
A small amount of annual attention can dramatically extend the lifespan of your edging while preserving the crisp, defined appearance that makes garden borders so effective.
Conclusion
Garden edging is one of those landscape features that often goes unnoticed when done well, yet its impact on the overall appearance and functionality of a garden is significant. Whether you prefer the clean lines of steel, the timeless appeal of brick and stone, the warmth of timber, or the softness of living plant borders, the right edging helps bring structure, definition, and polish to outdoor spaces.
Beyond aesthetics, quality edging can reduce maintenance, prevent grass from invading borders, keep mulch and soil in place, and make routine gardening tasks easier. The best choice will depend on your garden style, budget, and how much long-term upkeep you are willing to undertake.
As with many aspects of garden design, there is no single perfect solution. A contemporary courtyard may benefit from sleek metal edging, while a cottage garden might look more at home with reclaimed brick or flowering ground covers. By selecting materials that complement both your home and landscape, you can create borders that feel intentional, attractive, and built to last.
Whether you are refreshing existing beds or redesigning your entire garden, investing time in choosing the right edging can make a remarkable difference. Sometimes it is the smallest details that have the biggest effect, and well-defined garden borders are a perfect example of that principle in action.
Related Posts
For most content related to garden edging in various forms, check out these posts:
Garden pond edging ideas
Grass edging 101: why it’s essential for a neat lawn
0
Related
Read the full article here


